Want to stand out in your emails? Learn how to create a professional and eye-catching Gmail signature in this comprehensive tutorial! This step-by-step guide covers everything you need to know about crafting an impressive signature that reflects your brand or personality.
In this Gmail signature tutorial, you’ll discover:
✅ How to access and navigate Gmail settings for signature creation.
✅ Customizing your signature with fonts, colors, images, and hyperlinks.
✅ Adding social media icons and contact details for maximum impact.
✅ Best practices for designing an effective and professional signature.
✅ Tips for ensuring your signature displays perfectly on all devices.
Whether you’re an entrepreneur, professional, or enthusiast, a well-crafted email signature can leave a lasting impression. Watch now and level up your email communication with a personalized Gmail signature!
Are you preparing for the AWS Certified Solutions Architect Associate exam and looking for valuable insights into the type of questions you might encounter? Look no further! In this comprehensive video, we’ve compiled a curated set of AWS Solution Architect Associate level questions and answers that will help you supercharge your exam preparation.
Our expertly crafted questions cover a wide range of AWS services, architecture best practices, security, and more. Whether you’re a seasoned AWS pro or just starting your journey, these questions will challenge your knowledge and ensure you’re fully prepared for the exam.
🎓 Don’t miss this opportunity to enhance your skills and level up your AWS expertise!
Watch the video, test your skills, and take one step closer to becoming a certified AWS professional!
👍 If you find this video helpful, please like, share, and subscribe for more engaging content on AWS, cloud computing, and technology trends. Let’s journey through the cloud together! #AWS #SolutionArchitect #CloudComputing #CertificationPrep
1. A company wants to ensure the highest level of durability for data stored in Amazon S3. Which S3 storage class provides this durability?
A. S3 Standard
B. S3 One Zone-Infrequent Access
C. S3 Glacier
D. S3 Intelligent-Tiering
2. An organization is planning to migrate a large amount of data to Amazon S3. What service can be used to transfer data securely and quickly from an on-premises environment to Amazon S3?
A. AWS Snowball
B. AWS DataSync
C. AWS Direct Connect
D. AWS Transfer for SFTP
3. A company wants to deploy a web application that requires a relational database service. Which AWS service is suitable for hosting a managed relational database?
A. Amazon RDS
B. Amazon DynamoDB
C. Amazon Redshift
D. Amazon S3
4. An organization needs to secure access to their EC2 instances in a VPC. Which service provides centralized control of access to EC2 instances?
A. AWS IAM
B. Amazon CloudFront
C. AWS WAF
D. Amazon VPC Security Groups
5. A company wants to monitor and collect metrics about their AWS resources and applications. Which AWS service can be used for this purpose?
A. Amazon CloudFront
B. AWS CloudTrail
C. Amazon RDS
D. Amazon S3
6. An organization wants to host a static website using AWS services. Which service is ideal for hosting static websites?
A. Amazon S3
B. Amazon EC2
C. Amazon RDS
D. Amazon DynamoDB
7. A company needs to securely store and manage encryption keys for their applications and services. Which AWS service provides centralized key management?
A. AWS Certificate Manager
B. AWS Key Management Service (KMS)
C. AWS Identity and Access Management (IAM)
D. AWS CloudHSM
8. An organization needs to route traffic between different AWS services within a VPC securely. Which service provides fully managed, private connectivity?
A. Amazon CloudFront
B. AWS Direct Connect
C. Amazon VPC Peering
D. AWS PrivateLink
26 More Questions and Answers in the above video.
Answers and Explanation:
1. A – S3 Standard storage class provides the highest level of durability by replicating data across multiple devices and facilities within a region. One Zone-Infrequent Access, Glacier, and Intelligent-Tiering offer different trade-offs in terms of durability and cost.
2. A – AWS Snowball is a service that allows for secure and quick transfer of large amounts of data to and from AWS using physical storage appliances. DataSync is for online data transfer. Direct Connect is for dedicated network connections. Transfer for SFTP is for SFTP-based file transfers.
3. A – Amazon RDS (Relational Database Service) is a managed service that simplifies the setup, operation, and scaling of a relational database in the cloud. DynamoDB is a NoSQL database service, Redshift is a data warehousing service, and S3 is an object storage service.
4. A – AWS Identity and Access Management (IAM) provides centralized control of access to AWS resources, including EC2 instances. CloudFront is a content delivery network service. WAF is a web application firewall service. VPC Security Groups are used to control inbound and outbound traffic to EC2 instances.
5. B – AWS CloudTrail enables governance, compliance, operational auditing, and risk auditing of your AWS account. It records AWS API calls for your account. CloudFront is a content delivery network service. RDS is a managed relational database service. S3 is an object storage service.
6. A – Amazon S3 (Simple Storage Service) is ideal for hosting static websites. S3 allows you to store and retrieve files, making it suitable for hosting static content. EC2 is a compute service. RDS is a managed relational database service. DynamoDB is a NoSQL database service.
7. B – AWS Key Management Service (KMS) is a managed service that makes it easy for you to create and control the encryption keys used to encrypt your data. Certificate Manager is for SSL/TLS certificates. IAM is for access management. CloudHSM is for dedicated hardware security modules (HSMs).
8. D – AWS PrivateLink provides private connectivity between VPCs, AWS services, and on-premises applications, securely on the Amazon network. CloudFront is a content delivery network service. Direct Connect is for dedicated network connections. VPC Peering connects VPCs within the same AWS region.
I’m going to help you troubleshoot a particular issue that many AWS users face – locked out of SSH into your EC2 instance. This might happen if you have made some changes in firewall (in Ubuntu its ufw) for example you enabled it and allowed some port only and if that ssh connection broke or something, you can’t get reconnect. Don’t worry; I’ve got your back! In just couple of minutes, I’ll show you some quick steps to get you back on track.
Before we dive in….. there are couple of points to remember
1.) This procedure requires a stop and start of the EC2 instance. If the instance has any data stored on instance store volumes, that data is deleted after stopping the instance.
2.) If the instance is part of an Amazon EC2 Auto Scaling group, then terminating the instance might also stop instances within the Auto Scaling group.
3.) If the instance is launched by services that use AWS Auto Scaling, then terminating the instance might also stop instances within the Auto Scaling group.
4.) Instance termination depends on the instance scale-in protection settings for the Auto Scaling group. If the instance is part of an Auto Scaling group, temporarily remove the instance from the Auto Scaling group before starting the resolution steps.
5.) Stopping and starting the instance changes the public IP address of the instance. It’s a best practice to use an Elastic IP address instead of a public IP address when routing external traffic to the instance.
==============================================
Follow these steps to configure user-data for the instance:
==============================================
1.) Open the Amazon EC2 console.
2. Choose Instances from the navigation pane, and then select the instance that you plan to connect to.
3. Stop the instance.
4. Choose Actions, Instance Settings, Edit User Data.
5. Copy the following user data script into the Edit User Data dialog box, and then choose Save.
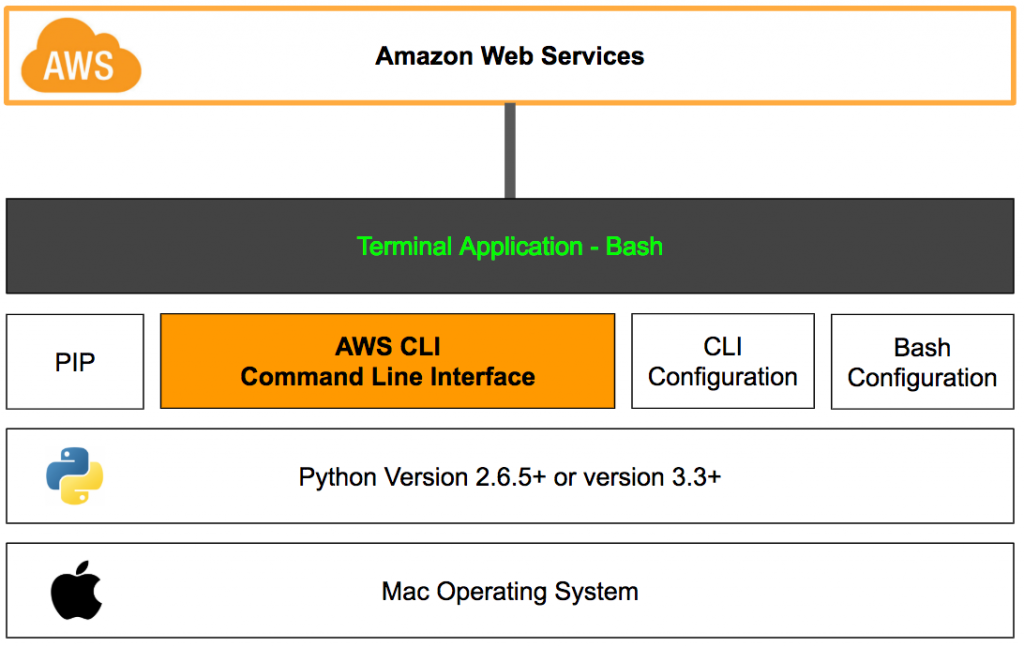
There are several components related to AWS CLI. The primary components we’ll use for this tutorial are AWS CLI, CLI Configuration, Bash Configuration, Terminal Application and AWS account. Refer to below diagram to understand the overall architecture.
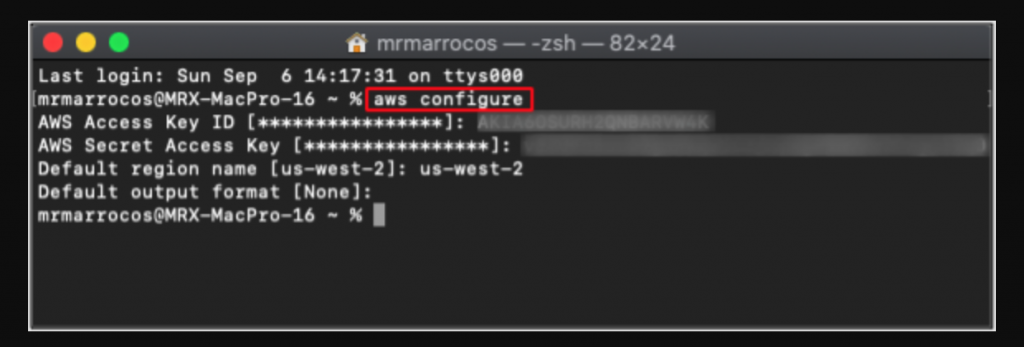
1. AWS Configure Command
First way to authenticate to your AWS account using the AWS CLI is to use the configure command. This command prompts you for 4 information
AWS Access Key
AWS Secret Key
Default Region
Default Output format
Note that this method requires use of AWS Access and Secret key. To obtain this key set, log into your AWS console and download it for one of your IAM user. It is highly recommended that you don’t use the root user for this type of access use case. Instead create IAM user and group.
Enter output format. Valid values are json, text and table. Note that this value only affects the format of the response on the Terminal application and does not affect any functionality.
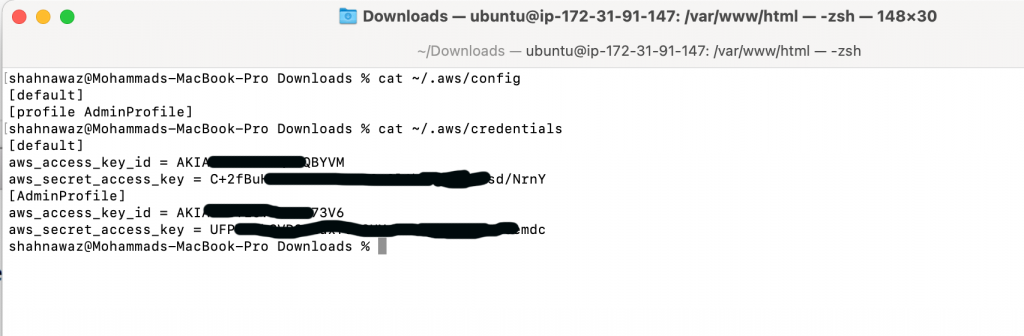
2. Named Profiles
A profile is a set of 4 values (AWS access key, secret key, default region and output format) identified by a profile name. AWS CLI uses 2 files named profiles and credentials to store these values on your computer. The credentials file contains AWS access key and secret keys pairs per profile. The profile file stores region and output pairs per profile. These files are located in a hidden folder called .aws in your home directory.
You can store multiple profiles in these files and use them in the AWS CLI by referring to the profile name. By default, when you use the aws configure command, the information is stored as default profile
Adding a New AWS CLI Profile
Follow these steps to add a new profile called AdminProfile. You can choose whatever name you want. Note that the profile created through these steps will be stored in the AWS CLI’s credential and config files under .aws folder in your home directory.
Open Terminal application
Type aws configure ––profile AdminProfile
Enter AWS Access Key ID
Enter AWS Secret Access Key
Enter default region name
Enter default output format
At this point a new profile entry is created in your local AWS CLI credentials and config files.
Using AWS CLI Profile with Command Option
Once you have a profile saved locally, you can reference the profile in any AWS CLI command by adding the ––profile option. As example, to issue command using a named profile called MyAdmin, add the option ––profile AdminProfile to your command. AWS CLI will issue the command using the stored profile and its permissions.
Environment variables are global values that are stored in your computer’s memory that can be used by various programs. There are several environment variables that AWS CLI natively understands. AWS CLI will use the values in the environment variables and overrides all other configured values such as named profile setting. Only exception is the command line parameter where you type in the option parameter directly along with the command. You can see complete list of environment variables that AWS CLI supports.
Follow these steps to set an environment variables. This example sets the variable AWS_DEFAULT_OUTPUT to a value table.
Open Terminal application
Type export AWS_DEFAULT_OUTPUT=table
This should set an environment variable named AWS_DEFAULT_OUTPUT to a value “table”.
In order to verify, type echo $AWS_DEFAULT_OUTPUT
This should respond with value “table”
If you want to see all environment variables on your computer, type printenv.
Now whenever you issue an AWS CLI command, the result will be in table format regardless of the output format set in your profile. To override the environment variable value, add the corresponding option directly in the command. For example, to override the AWS_DEFAULT_OUTPUT environment value, use ––output option in the command (i.e. aws iam get-user ––output json which will respond in json format for this command only).
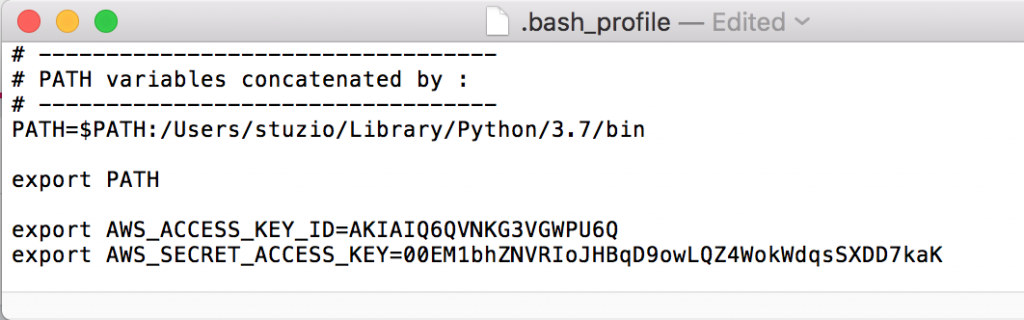
Setting AWS CLI Environment Variables in the .bash_profile
You can use the .bash_profile file to set commonly used environment variables so they are automatically available every time you open the terminal application. The .bash_profile file is simply a text file that the terminal application executes when it starts.
If you don’t use .bash_profile and just set the environment variable using the export command in the terminal application, the environment variables are only set for the current session. This means that when you restart the computer or quit the terminal application, the set values will be gone.
Follow these steps to set environment variables in the .bash_profile file. In this example, we’ll set the AWS_ACCEESS_KEY_ID and AWS_SECRET_KEY environment variable values.
Find .bash_profile file on your computer. This file is located in your user’s home directory. Note that this file is hidden file type and may not display by default on your computer.
If you are using Terminal application, type cd $HOME to go to your home directory. Then type ls -a to list all items including hidden files.
If you are using Finder, navigate to your user home directory and press shift command . (period) keys at same time to toggle to display hidden items.
You should see .bash_profile file. If you don’t see this file, you can create one.
(optional) Create a new .bash_profile file (only if you don’t already have one)
Open Terminal application and navigate to. home directory by typing cd $HOME
Type nano .bash_profile This command opens a text editor
Press control x keys to exit and type Y to save the file. This action creates a blank .bash_profile file.
Open .bash_profile file from Finder. This opens up a TextEdit program.
Enter the AWS_ACCESS_KEY_ID and AWS_SECRET_ACCESS_KEY values
export AWS_ACCESS_KEY_ID=YourAccessKeyIDhere
export AWS_SECRET_KEY=YourSecretKeyhere
Save the .bash_profile file.
Quit the terminal application and reopen it. The new Terminal application will be initialized with 2 environment variables.
To see all of the environment variables currently set, type printenv
Now when you issue AWS command, the AWS CLI will automatically use the AWS_ACCESS_KEY_ID and AWS_SECRET_ACCESS_KEY value in the environment variable overriding any profiles configured in the AWS profiles and credentials file.
You can see current IAM user that CLI is using by typing aws iam get-user which should return user profile current credential. Note that this command requires minimally IAMReadOnlyAccess permission to execute.
4. Configuration Precedence
It’s important to understand the precedence of the configuration that AWS CLI uses when using combination of techniques namely command line options, environment variables and named profiles.
AWS CLI will always use the command line options you type directly into the command using double dashes. As example, to output response as JSON format, you can append ––output json to your command. This method will override any other configuration such as named profile and environment variables.
Example: aws iam get-user ––output json
In absence of command line option, AWS CLI will use the environment variables. The environment variables set either via export command in the Terminal application directly in the session or via .bash_profile file will override any other configuration such as named profile.
Example: export AWS_DEFAULT_OUTPUT=table
In absence of command line option and environment variables, AWS CLI will use the values set in the named profiles in the credentials file
In absence of values in the command line option, environment variables and credentials file, then AWS will use the values in the config file.
There are several ways to configure AWS CLI to work with your AWS account. First method is using the aws configure command which saved as the default profile. Second method is setting one or more named profile in the AWS CLI config and credentials file. This is convenient way to store multiple profiles on your local computer. Third option is using the predefined environment variables that AWS CLI understands. Environment variables can be configured in the .bash_profile file to be set automatically whenever Terminal application starts.
When using one or more configuration methods, it’s important to understand the precedence. Namely, the options directly passed into the command line takes highest precedence. Then environment variables followed by named profiles.
You move apps out of your organisation’s catalog of apps by transferring an app to another organisation. You want to transfer an app when you’ve sold the app to another developer or you want to move it to another iTunes Connect organisation.
You can transfer the ownership of an app to another developer without removing the app from the store. The app retains its reviews and ratings during and after the transfer, and users continue to have access to future updates. There’s no limit to the number of apps you can transfer, but each app needs to be transferred individually.
In this video I will walk through the entire process to transfer the app from one account into another.
Does your application contain a Drawer? Do you want to have it up and running in less than 5 minutes? Do you want your drawer to follow the Android Design Guidelines? Do you have profiles? Do you need flexibility? Is Google’s navigation Drawer of the design support not enough for you? Do you want a simple and easy to understand api?
If any (or all) of these questions seem familiar, the MaterialDrawer is the perfect library for you all.
Never waste your time again. It provides you with the easiest possible implementation of a navigation drawer for your application. There is a Header with profiles (AccountHeader), a MiniDrawer for Tablets (like Gmail), provide custom DrawerItems, custom colors, custom themes, … No limits for customizations.
Implementing a Navigation Drawer was never that easy.
Github page for MaterialDrawer Library: https://github.com/mikepenz/MaterialDrawer