
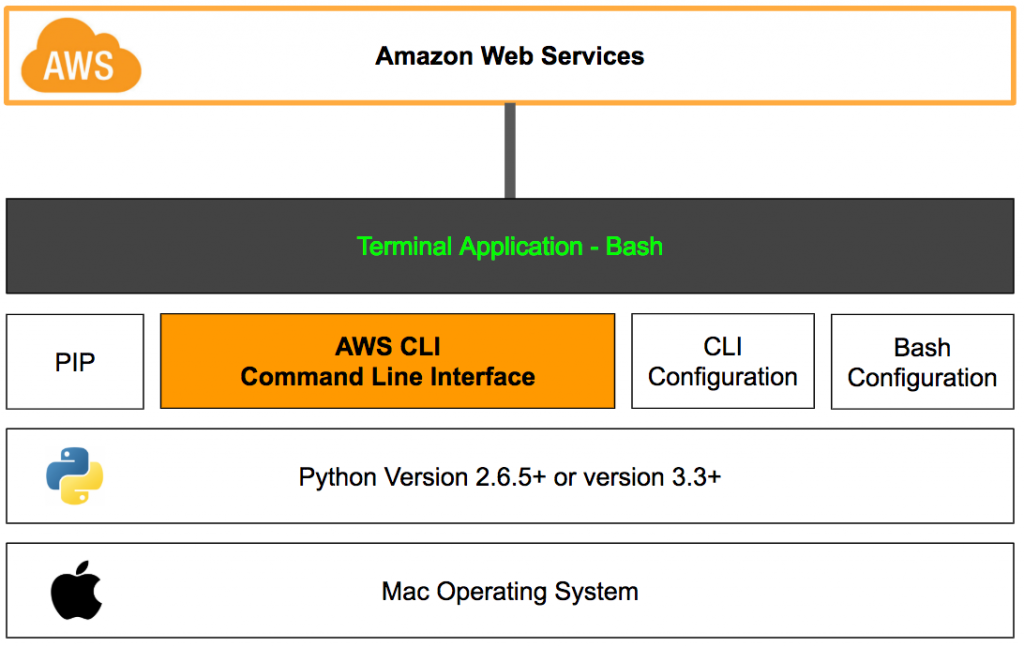
There are several components related to AWS CLI. The primary components we’ll use for this tutorial are AWS CLI, CLI Configuration, Bash Configuration, Terminal Application and AWS account. Refer to below diagram to understand the overall architecture.
1. AWS Configure Command
First way to authenticate to your AWS account using the AWS CLI is to use the configure command. This command prompts you for 4 information
- AWS Access Key
- AWS Secret Key
- Default Region
- Default Output format
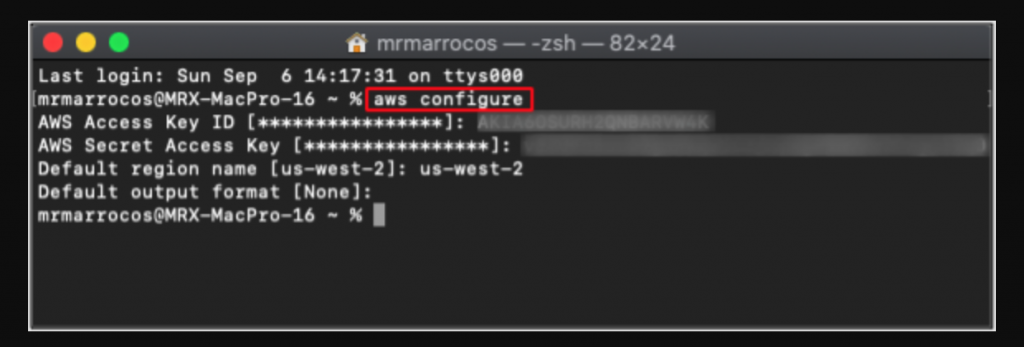
Note that this method requires use of AWS Access and Secret key. To obtain this key set, log into your AWS console and download it for one of your IAM user. It is highly recommended that you don’t use the root user for this type of access use case. Instead create IAM user and group.
- Open Terminal application
- Type aws configure
- Enter AWS Access Key ID string
- Enter AWS Secrete Key String
- Enter default region code. See AWS Regions and Endpoints for valid region codes.
- Enter output format. Valid values are json, text and table. Note that this value only affects the format of the response on the Terminal application and does not affect any functionality.
2. Named Profiles
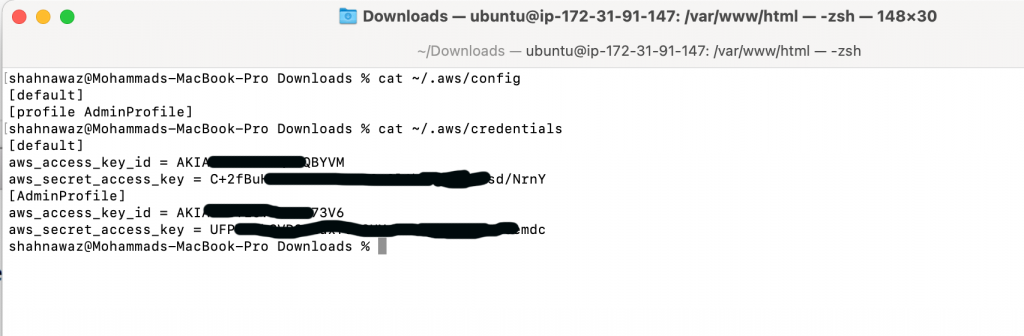
A profile is a set of 4 values (AWS access key, secret key, default region and output format) identified by a profile name. AWS CLI uses 2 files named profiles and credentials to store these values on your computer. The credentials file contains AWS access key and secret keys pairs per profile. The profile file stores region and output pairs per profile. These files are located in a hidden folder called .aws in your home directory.
You can store multiple profiles in these files and use them in the AWS CLI by referring to the profile name. By default, when you use the aws configure command, the information is stored as default profile
Adding a New AWS CLI Profile
Follow these steps to add a new profile called AdminProfile. You can choose whatever name you want. Note that the profile created through these steps will be stored in the AWS CLI’s credential and config files under .aws folder in your home directory.
- Open Terminal application
- Type aws configure ––profile AdminProfile
- Enter AWS Access Key ID
- Enter AWS Secret Access Key
- Enter default region name
- Enter default output format
- At this point a new profile entry is created in your local AWS CLI credentials and config files.
Using AWS CLI Profile with Command Option
Once you have a profile saved locally, you can reference the profile in any AWS CLI command by adding the ––profile option. As example, to issue command using a named profile called MyAdmin, add the option ––profile AdminProfile to your command. AWS CLI will issue the command using the stored profile and its permissions.
Example using stored profile named AdminProfile:
- aws s3 ls ––profile AdminProfile
- aws s3 mb s3://com.geekmentor.bucket.demo ––profile AdminProfile
3. Environment Variables
Environment variables are global values that are stored in your computer’s memory that can be used by various programs. There are several environment variables that AWS CLI natively understands. AWS CLI will use the values in the environment variables and overrides all other configured values such as named profile setting. Only exception is the command line parameter where you type in the option parameter directly along with the command. You can see complete list of environment variables that AWS CLI supports.
Follow these steps to set an environment variables. This example sets the variable AWS_DEFAULT_OUTPUT to a value table.
- Open Terminal application
- Type export AWS_DEFAULT_OUTPUT=table
- This should set an environment variable named AWS_DEFAULT_OUTPUT to a value “table”.
- In order to verify, type echo $AWS_DEFAULT_OUTPUT
- This should respond with value “table”
- If you want to see all environment variables on your computer, type printenv.
Now whenever you issue an AWS CLI command, the result will be in table format regardless of the output format set in your profile. To override the environment variable value, add the corresponding option directly in the command. For example, to override the AWS_DEFAULT_OUTPUT environment value, use ––output option in the command (i.e. aws iam get-user ––output json which will respond in json format for this command only).
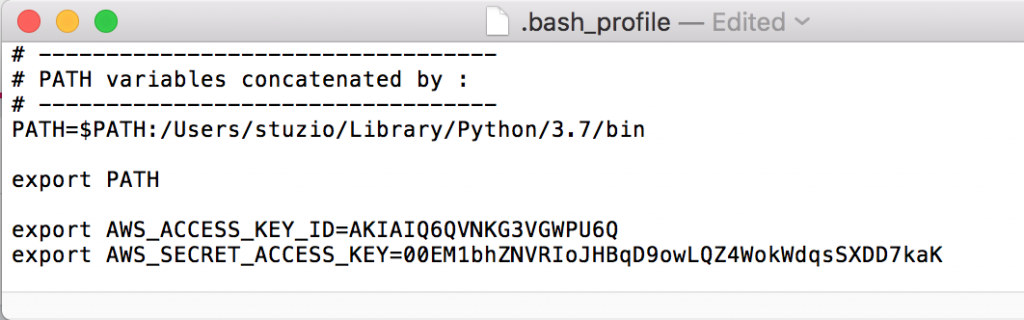
Setting AWS CLI Environment Variables in the .bash_profile
You can use the .bash_profile file to set commonly used environment variables so they are automatically available every time you open the terminal application. The .bash_profile file is simply a text file that the terminal application executes when it starts.
If you don’t use .bash_profile and just set the environment variable using the export command in the terminal application, the environment variables are only set for the current session. This means that when you restart the computer or quit the terminal application, the set values will be gone.
Follow these steps to set environment variables in the .bash_profile file. In this example, we’ll set the AWS_ACCEESS_KEY_ID and AWS_SECRET_KEY environment variable values.
- Find .bash_profile file on your computer. This file is located in your user’s home directory. Note that this file is hidden file type and may not display by default on your computer.
- If you are using Terminal application, type cd $HOME to go to your home directory. Then type ls -a to list all items including hidden files.
- If you are using Finder, navigate to your user home directory and press shift command . (period) keys at same time to toggle to display hidden items.
- You should see .bash_profile file. If you don’t see this file, you can create one.
- (optional) Create a new .bash_profile file (only if you don’t already have one)
- Open Terminal application and navigate to. home directory by typing cd $HOME
- Type nano .bash_profile This command opens a text editor
- Press control x keys to exit and type Y to save the file. This action creates a blank .bash_profile file.
- Open .bash_profile file from Finder. This opens up a TextEdit program.
- Enter the AWS_ACCESS_KEY_ID and AWS_SECRET_ACCESS_KEY values
- export AWS_ACCESS_KEY_ID=YourAccessKeyIDhere
- export AWS_SECRET_KEY=YourSecretKeyhere
- Save the .bash_profile file.
- Quit the terminal application and reopen it. The new Terminal application will be initialized with 2 environment variables.
- To see all of the environment variables currently set, type printenv
- Now when you issue AWS command, the AWS CLI will automatically use the AWS_ACCESS_KEY_ID and AWS_SECRET_ACCESS_KEY value in the environment variable overriding any profiles configured in the AWS profiles and credentials file.
- You can see current IAM user that CLI is using by typing aws iam get-user which should return user profile current credential. Note that this command requires minimally IAMReadOnlyAccess permission to execute.
4. Configuration Precedence
It’s important to understand the precedence of the configuration that AWS CLI uses when using combination of techniques namely command line options, environment variables and named profiles.
- AWS CLI will always use the command line options you type directly into the command using double dashes. As example, to output response as JSON format, you can append ––output json to your command. This method will override any other configuration such as named profile and environment variables.
- Example: aws iam get-user ––output json
- In absence of command line option, AWS CLI will use the environment variables. The environment variables set either via export command in the Terminal application directly in the session or via .bash_profile file will override any other configuration such as named profile.
- Example: export AWS_DEFAULT_OUTPUT=table
- In absence of command line option and environment variables, AWS CLI will use the values set in the named profiles in the credentials file
- In absence of values in the command line option, environment variables and credentials file, then AWS will use the values in the config file.
You can see full list of precedence of the AWS CLI configurations for other use cases.
Summary
There are several ways to configure AWS CLI to work with your AWS account. First method is using the aws configure command which saved as the default profile. Second method is setting one or more named profile in the AWS CLI config and credentials file. This is convenient way to store multiple profiles on your local computer. Third option is using the predefined environment variables that AWS CLI understands. Environment variables can be configured in the .bash_profile file to be set automatically whenever Terminal application starts.
When using one or more configuration methods, it’s important to understand the precedence. Namely, the options directly passed into the command line takes highest precedence. Then environment variables followed by named profiles.